-
2015-11-26
Usenix LISA 2015 Tutorial on GlusterFS
I have been working in GlusterFS for quite some time now. As you might know that GlusterFS is an open source distributed file-system. What differentiate Gluster from other distributed file-system is its scale-out nature, data access without metad…
-
2014-10-22
Gluster Volume Snapshot Howto
This article will provide details on how to configure GlusterFS volume to make use of Gluster Snapshot feature. As we have already discussed earlier that Gluster Volume Snapshot is based of thinly provisioned logical volume (LV). Therefore here I wi…
-
2014-10-07
Gluster Volume
GlusterFS
GlusterFS is an open source distributed file system. It incorporates automatic fail-over as a primary feature. All of this is accomplished without a centralized metadata server. Which also guarantees no single point of failure.
The detail documentation and getting started document can be found at Gluster.org. In this article I want to give an overview of Gluster so that you can understand GlusterFS volume snapshot better.
Let’s say you have some machines (or virtual machines) where you want to host GlusterFS. So the first thing you want to install is a POSIX compliant operating system, e.g. Fedora, CentOS, RHEL, etc. Install GlusterFS server on all these machines. Click here to get the detailed instruction on how to install GlusterFS. Once GlusterFS server is installed on each machine you have to start the server. Run the following command to start the GlusterFS server:
service glusterd start
Or, start the server using the following command:
glusterd
Now, you have multiple GlusterFS servers, but they are not part of the Gluster “Trusted Storage Pool” yet. All the servers should be part of the “Trusted Storage Pool” before they can be accessed. Lets say you have 3 servers, Host1, Host2, and Host3. Run the following command to add them to the Gluster Trusted Storage Pool.
[root@Host1]# gluster peer probe Host2
peer probe: successNow, Host1 and Host2 are in the Trusted Storage Pool. You can check the status of the peer probe using the peer status command.
[root@Host1]# gluster peer status
Number of Peers: 1
Hostname: Host2
Uuid: 3b51894a-6cc1-43d0-a996-126a347056c8
State: Peer in Cluster (Connected)If you have any problems during the peer probe, make sure that your firewall is not blocking Gluster ports. Preferably, your storage environment should be located on a safe segment of your network where firewall is not necessary. In the real world, that simply isn’t possible for all environments. If you are willing to accept the potential performance loss of running a firewall, you need to know the following. Gluster makes use of ports 24007 for the Gluster Daemon, 24008 for Infiniband management (optional unless you are using IB), and one port for each brick in a volume. So, for example, if you have 4 bricks in a volume, port 49152 – 49155 would be used . Gluster uses ports 34865 – 34867 for the inline Gluster NFS server. Additionally, port 111 is used for portmapper, and should have both TCP and UDP open.
Once Host1 and Host2 are part of the Trusted Storage Pool you have to add Host3 to the trusted storage pool. You should run the same gluster peer probe command from either Host1 or Host2 to add Host3 to the Trusted Storage Pool. You will see the following output when you check the peer status:
[root@Host1]# gluster peer status
Number of Peers: 2
Hostname: Host2
Uuid: 3b51894a-6cc1-43d0-a996-126a347056c8
State: Peer in Cluster (Connected)
Hostname: Host3
Uuid: fa751bde-1f34-4d80-a59e-fec4113ba8ea
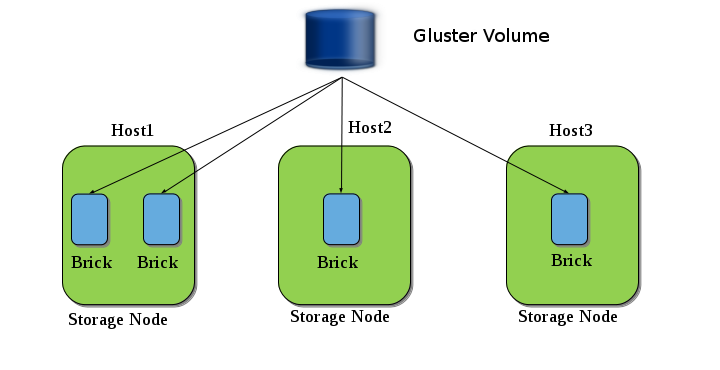
State: Peer in Cluster (Connected)Now, you have a Trusted Storage Pool with multiple servers or nodes, but still we are not ready for serving files from the trusted storage pool. GlusterFS volume is the unified namespace through which an user can access his/her files on the distributed storage. A Trusted Storage Pool can host multiple volumes. And each volume is made up of one or more bricks. The brick provides a mapping between the local file-system and the Gluster volume.
The above diagram shows an example of Gluster volume. Here we have three nodes (Host1, Host2 and Host3) and a Gluster Volume is created from the bricks present in those nodes.
Until now we have learned how to create a Trusted Pool, and now to create a volume you need to create bricks. These bricks can be a simple directory in your storage node, but to make use of snapshot feature these bricks have to adhere to some guidelines. In this document I provide you those guidelines and will take you through an example setup.
See guidelines for creating snapshot supportable volumes.
